How to configure Thunderbird 2 for Live Mail (MSN)

Last week I received this email from the Windows Live Hotmail Team:
You are receiving this note because you have used Microsoft Office Outlook, Outlook Express, or Entourage to view your Windows Live Hotmail®. Microsoft is changing the way these programs access Hotmail e-mail which will require you to take action.
To continue to receive e-mail from your Hotmail account, please select one of the alternative solutions below before September 1, 2009. After this day, new e-mail can only be delivered to your mail programs through the following alternative solutions.
I use, or used Office Outlook 2002, so my version was too old to use the Office Outlook Connector, so I followed the instructions for my version, but that didn’t work, I kept getting an error for the outgoing connections, I tried the ports and everything but it just wouldn’t work.
So I decided to try Thunderbird 2, I had an old version once but I was able to receive my emails on Outlook Express so I removed it from my pc.
Anyway, I tried the whole settings again and kept receiving all sorts of errors, when I was able to contact the incoming server I had the same issue as before with the outgoing server, so after looking around and trying this and that I was able to figure it out, so this is how you have to configure it:
First you have to add your account, if you are installing the program for the first time it will ask you to provide information about the accounts you’re trying to use, if you don’t know how to add an account just go Tools–>Account Settings–> Add account.
Before continuing just let me tell you, if you are new to email clients or new to the internet keep this in mind, when you see “youraccount@hotmail.com” in the settings I mean your email account, please don’t copy youraccount@hotmail.com as your email address, in my case I have a msn.com account so it’s not @hotmail.com but @msn.com, some of the new ones I believe are @live.com, so just keep that in mind.
So the first thing it asks you is the type of account, so we will select Email.
Now it will ask you your name, or the name you want to display when you send an email.
Next, it will ask you for your email address, that is the the address for the account you are adding.
Now it will ask you the server type, select POP.
For the incoming server type pop3.live.com, for the outgoing server type smtp.live.com.
For the incoming username just type your email address, the same for outgoing username.
When it asks you for the account name just give it a name so you know what it is, in my case I just named it MSN.
Click finish.
We are not over, this is not going to work until you do some changes through the tools menu, so if it gives you errors that’s fine, if it asks you for a password put it in and check the “remember password” box if you want the program to remember it, otherwise just type it and click ok.
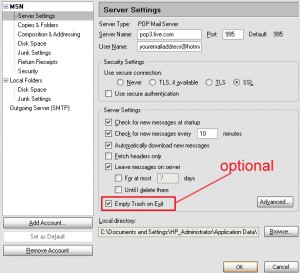
Now, go Tools–>Account Settings, now you will see the name of the account you just created, under that name click on Server Settings:
Once you click SSL the port will automatically change to 995 so you don’t have to type that part, DO NOT select Secure authentication, it’s not supported.
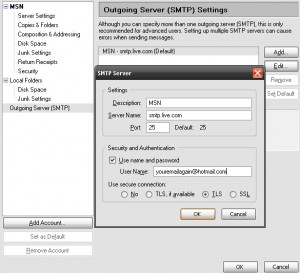
Now click on Outgoing Server (SMTP), select the connection for that account and click edit:
You will be asked for the password at some point so just type it and check the “remember password” box if you want.
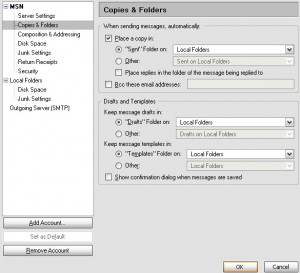
Additionally you might want to create the following folders if you don’t have them on your list already:
- Drafts
- Sent
- Junk
If you don’t you might want to create them in the local folders, then go into the account options again and change the settings like this:
You might want to also change the Junk settings, it’s something similar to the settings you see up there, but I’ll leave it up to you.
Just let me warn you, depending on the amount of messages you have in your account it will take a while for the program to get them all, in my case it copied over 700 messages, it will mark them all as new so just keep that in mind.
After that just send a test email to see if the SMTP settings work for you.
If that doesn’t work or somebody has a suggestion for this half-assed tutorial please let me know, I hope this helps.


One Comment
Pingback:Twitted by retrohellix